工欲善其事,必先利其器。對我來說,coding時拿在手上的工具是neovim。
neovim是一個文字編輯器。但它可透過VimScript或lua加入設定key bindings或加入客製化指令...等
除了程式碼編輯外,當程式碼完成修改要將變更提交到版本控制系統git時,使用git commit若沒傳入commit message,預設git會開啟使用者設定的預設文字編輯器請使用者填入commit message。
coding使用neovim,編輯commit message也是使用neovim。
此時就有個客製化需求了。我希望neovim可以在我需要提及先前commit時能自動:
- 使用正確的長度commit SHA hash參考提及的commit
- 使用linux kernel專案的方式引用提及的commit
If you want to refer to a specific commit, don’t just refer to the SHA-1 ID of the commit. Please also include the oneline summary of the commit, to make it easier for reviewers to know what it is about. Example:
Commit e21d2170f36602ae2708 ("video: remove unnecessary
platform_set_drvdata()") removed the unnecessary
platform_set_drvdata(), but left the variable "dev" unused,
delete it.
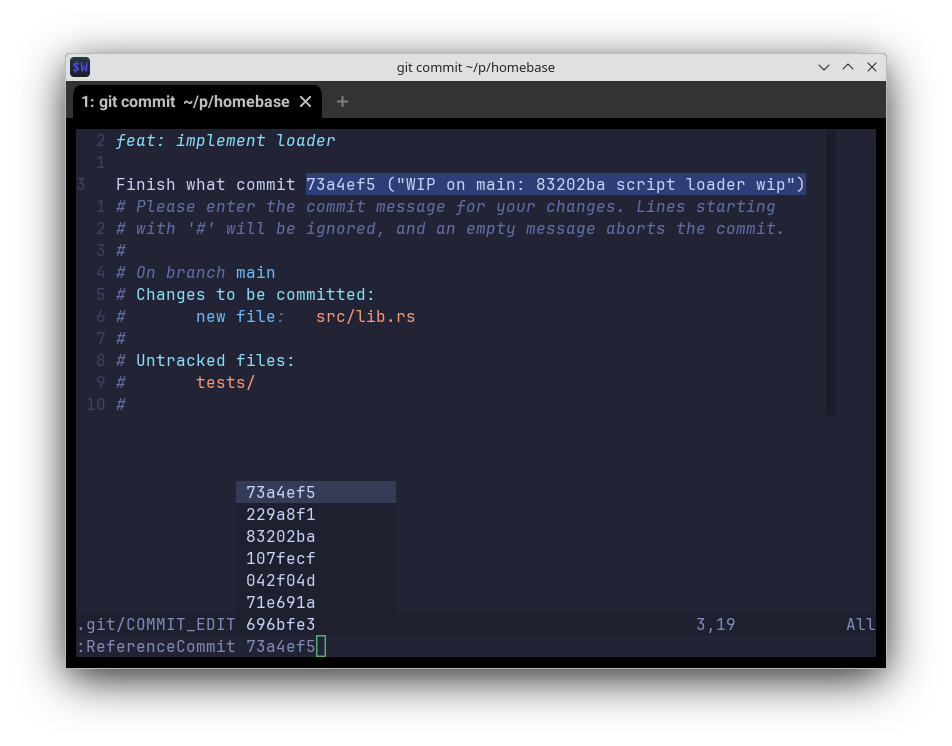
所以,我加了一個客製化指令,讓我想要參照先前commit時可以透過:ReferenceCommit <hash-prefix>來以正確的格式參照到commit message中。我甚至加了參數的autocomplete與preview。
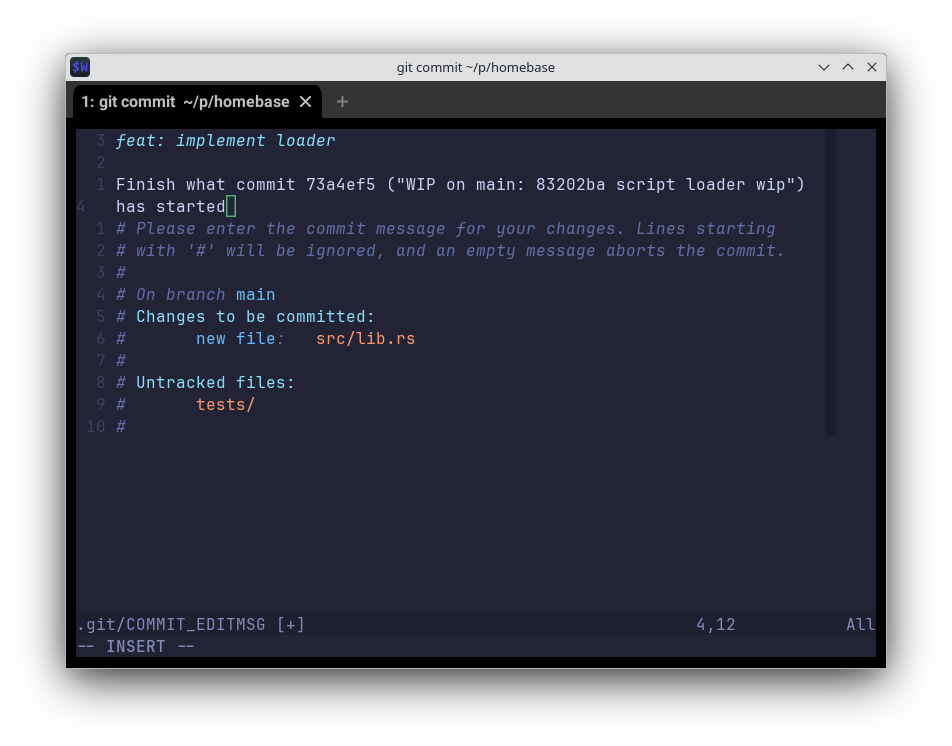
 按下enter後,格式化過的commit參照就被插入buffer中
ReferenceCommit是今天要被測試的主角。在動手寫測試前,想先談談,為什麼想對自訂指令寫測試?
為什麼要寫測試?
想對指令寫測試的原因無非是想確認指令有符合原先設計的需求。通常功能開發時,工程師、開發者會經歷多個edit-build-test循環。以ReferenceCommit這指令為例:
- edit, 開發者須先依照需求、要求寫出code,編輯程式碼。呼叫neovim提供的lua API定義
ReferenceCommit指令。 - build, 編譯語言需要透過編譯器編譯成執行檔或函式庫...等可供測試的軟體產物。但因lua為直譯語言,不需要經過編譯即可進行下一個階段:test。
- test, 測試階段。通常第一個測試是由開發者自己測試。如:打開vim輸入
:ReferenceCommit觀察指令有沒有如需求一樣將commit的title插入至buffer。
對於給自己使用的nvim指令,當開發出第一個版本、測試,確定能滿足自己的需求後,應該就足夠了。Right?
畢竟...
1st rule of programming: If it works don't touch it
Source: Programmer Humor
一段程式碼,不去修改它,理論上它可以運作到天長地久。但實務上,軟體產物,通常有外部相依性。常見的 外部相依性,如第三方套件、執行環境或使用的API。具體的例子是,過去的網站使用Flash製作動畫、遊戲。但即使Flash程式碼原封不動保留至今,現代瀏覽器也早已不再支援Flash1讓網站得以如以往正常運行。就算您的程式碼是「鑽石恆久遠,一顆永流傳」那般的存在,也會因為外部因素導致故障、變質。這種現象被稱為「軟體腐敗」
何況,我為neovim寫的客製化邏輯、腳本...等,是會被套用到我所使用的多部機器。不同機器安裝的neovim、git與作業系統都不同。 同時neovim專案也持續演化,今日打造指令所使用的lua API會因為種種原因被汰換(deprecated)。另一個外部相依性:git,也是可能隨著改版改變一些細節。 透過撰寫自動化測試,可以在環境異動的時候執行自我檢查。
如何為neovim的lua腳本寫測試
我對Vimscript不是很熟悉,且neovim的特色之一就是其提供使用lua API讓用戶客製化。 搜尋neovim的文件中,與測試有關的文件,是給VimScript的,目前沒搜尋到針對如何測試lua的文件。
所以,在摸索如何測試以lua撰寫的指令時,是從我曾安裝使用的lua插件中,找出有設置CI\CD與自動化測試的插件原始碼來參考。
Telescope.nvim便是符合以上條件的開源專案。可以看看他的GitHub Action設定檔與實際呼叫nvim執行測試的Makefile
觀察Telescope.nvim的測試流程,關鍵在於使用nvim headless mode執行測試指令PlenaryBustedDirectory
第一步:新增Makefile
為nvim自訂指令寫測試的第一步是先弄清楚要如何啟動nvim並與nvim互動。從Telescope.nvim的Makefile可以看到測試流程就是使用nvim --headless搭配-c參數執行PlenaryBustedDirectory指令。
或許最重要的是,了解到nvim --headless可以透過-c執行指令。同時luafile指令,可以執行指定路徑的lua腳本。也就是說,nvim本身可以作為lua直譯器使用。
從同一Telescope.nvim的Makefile可以看到,專案同時也使用nvim與:luafile執行腳本,自動產生文檔
構造乾淨的測試環境
執行測試時,我們會希望環境越單純越好,變因越少,測試結果意料之外時越容易釐清。
nvim啟動時會自動載入.vimrc或~/.config/init.lua ...等使用者的設定檔與插件。不同使用者、機器可能安裝不同的插件與設定。執行測試時,我們希望能略過這步驟,讓測試盡量可復現(reproducible)。
在使用nvim --headless -c執行指令前,額外加入以下參數2,透過"factory-new"的nvim執行測試:
--noplugin: 略過插件載入步驟,使nvim不載入任何插件(包含內建插件,如:可用於開啟目錄的netrw)-u NORC: 不載入使用者或環境內可用的初始化檔案
以上兩個參數也可以改為-u NONE,可以同時略過插件與初始檔案載入。但實務上進行測試時,我們可能會需要指定一個minimum vimrc去載入測試過程需要使用的插件或測試框架(test harness)
Makefile: 加入執行任意lua腳本的Phony target
Makefile:
.PHONY: try

NVIM_FLAGS=--headless --noplugin -u NORC

try:
	nvim $(NVIM_FLAGS) -c 'luafile $(LUA_FILE)' -c 'qa'
try target可以透過LUA_FILE變數指定要執行的lua設定檔
Let's try.
check_world.lua:
function my_test()
  local world = 'hello world!'
  assert(#world == 11, "the world's length isn't 12")
end

local success, err = pcall(my_test)
if success then
  print('ok')
else
  print(vim.inspect(err))
  vim.cmd('1cq')
end
指定變數並執行try
[I]tony@archlinux ~/p/d/.c/n/tests (main)>
make try LUA_FILE=./check_world.lua

nvim --headless --clean --noplugin -u ./init.lua -c 'luafile ./check_world.lua' -c 'qa'
"./check_world.lua:3: the world's length isn't 12"make: *** [Makefile:8: try] Error 1
⏎
我們能以:luafile作為立基點,執行任意腳本、透過assert比對函式回傳值...等。只是如check_world.lua中所見,由於luafile執行的腳本丟出錯誤時,nvim並不會以非零error code結束,會造成外部測試系統或CI無從判斷測試是否成功。所以需要以pcall包裹測試碼、檢查有沒有丟出錯誤。在有丟出錯誤時,呼叫vim指令1cq以error code: 1結束nvim。
以plenary.nvim test_harness提供的工具作為test harness
Telescope.nvim專案使用plenary.nvim提供helpers的作為test harness。Test harness協助處理check_world.lua這種Proof-of-Concept中沒注意到的細節,如:
- 當有多個測試情境、測試碼時,統計成功與失敗的測試,並分門別類回報錯誤訊息
- 透過檔名自動由資料夾蒐集需要執行的測試碼
- 多個測試使用不同nvim實體執行,非同步執行且避免彼此干擾
第二步:建立最小初始化檔案,僅載入plenary.nvim
前面的步驟,透過-u NORC或-u NONE...等參數使nvim略過套件、初始檔載入步驟。
要以plenary.nvim作為test harness進行測試前,我們需要先在"factory-new"的nvim將它作為插件載入。
要在nvim載入插件、函式庫,正常情境下是透過套件管理工具,如:lazy.nvim
但Telescope.nvim的測試流程中,是以lua模組的方式載入plenary.nvim。我們希望測試環境盡量單純,因此我選擇嘗試Telescope.nvim載入plenary.nvim的方式:
- 於測試環境載入plenary.nvim的原始碼
- 建立最小初始檔案,最小初始檔案透過
-u提供給headless nvim。最小初始檔案設定nvim:將plenary.nvim原始的位置加入rtp(runtimepath),並透過runtime!載入plenary.nvim
Telescope.nvim載入plenary.nvim的方式是在CI執行測試前,使用git clone載入。由於我沒使用GitHub action,且希望測試能在本地運行而不仰賴其他task/CI runners。因此是選擇透過將plenary.nvim以git submodule的方式加入至working directory。
給測試使用的minimum初始化檔案,則是:
tests/init.lua:
vim.opt.rtp:append './plenary.nvim'
vim.cmd 'runtime! plugin/plenary.vim'
建立最小初始化檔案後,修改我們的nvim headless啟動參數:
將原先的-u NORC改為引入最小初始化檔案
Makefile:
.PHONY: try

NVIM_FLAGS=--headless --noplugin -u ./tests/init.lua

try:
	nvim $(NVIM_FLAGS) -c 'luafile $(LUA_FILE)' -c 'qa'
第三步:加入執行測試檔的target
加入執行PlenaryBustedDirectory的target "test"
PlenaryBustedDirectory會執行檔案目錄中的測試檔。
:PlenaryBustedDirectory {path} {options}
Run tests for all
*_spec.luafiles in the given path.{options} is a table, see |plenary-test-usage|. 假設測試檔置於於
spec,第一個參數{path}是./spec,第二的參數{options}則指定`minimal_init為我們的最小化初始檔 Makefile:
.PHONY: try

NVIM_FLAGS=--headless --noplugin -u ./tests/init.lua

try:
	nvim $(NVIM_FLAGS) -c 'luafile $(LUA_FILE)' -c 'qa'

test:
	nvim $(NVIM_FLAGS) -c 'PlenaryBustedDirectory ./spec {minimal_init="./init.lua"}' -c 'qa'
第四步:加入測試檔
在spec中加入測試檔
以check_world.lua改為busted的格式為例
spec/check_world_spec.lua
describe('world', function ()
  it('has 12 characters', function ()
    local world = 'hello world!'
    assert(#world == 12, "the world's length isn't 12")
  end)
end)
加入第一個測試檔後,可以使用make test執行測試:
[I] tony@archlinux ~/demo> make test
nvim --headless --clean --noplugin -u ./init.lua -c 'PlenaryBustedDirectory ./spec {minimal_init="./init.lua"}' -c 'qa'
Starting...Scheduling: ./spec/world_spec.lua

========================================
Testing:        ~/demo/spec/world_spec.lua
Success ||      world has 12 characters

Success:        1
Failed :        0
Errors :        0
========================================
[I] tony@archlinux ~/demo>
至此,大致就是為nvim插件、客製化寫自動畫測試的流程。
接下來的部份,則是ReferenceCommit指令的測試過程,僅供參考。
額外細節:關於ReferenceCommit的測試
測試計畫大略如下:
- 建立git repository
- 在git repository中加入一些dummy files後已固定的commit message新增commit
- 在nvim中執行指令,看看指令運行後插入到buffer的內容是否符合格式
自動建立測試用的git repository
要在自動化測試建立git repository,首先需要先建立git repository。但再建立git repository之前會須先要有個目錄。
要自動於測試開始時建立目錄、測試結束時刪除殘留檔案,甚至測試失敗時收拾殘局。
為此,先新增一個helper: tempdir。tempdir.with允許傳入一個callback。測試用的暫時性目錄創見後,會呼叫callback。
當callback完成測試return時,再刪除暫存目錄。
tempdir.lua(tempdir模組):
---@class TempDir
local M = {}
local uv = vim.loop

--- Helper function to create a temporary directory
---@return string # The path to the created temporary directory
local function create_tempdir()
    local temp_dir = uv.fs_mkdtemp("/tmp/nvim-tempdir-XXXXXX")
    if not temp_dir then
        error("Failed to create temporary directory")
    end
    return temp_dir
end

--- Helper function to remove a directory recursively
---@param path string # The path to the directory to remove
local function remove_dir(path)
    local function rm_recursive(dir)
        local iter = uv.fs_scandir(dir)
        if not iter then
            return
        end
        while true do
            local entry = uv.fs_scandir_next(iter)
            if not entry then
                break
            end
            local child = dir .. "/" .. entry
            local stat = uv.fs_stat(child)
            if stat and stat.type == "directory" then
                rm_recursive(child)
            else
                uv.fs_unlink(child)
            end
        end
        uv.fs_rmdir(dir)
    end
    rm_recursive(path)
end

--- Main function to provide tempdir functionality
---@param callback fun(temp_dir: string) # The callback function that receives the temporary directory path
function M.with(callback)
    local temp_dir = create_tempdir()
    local success, err = pcall(callback, temp_dir)
    remove_dir(temp_dir)
    if not success then
        error(err)
    end
end

return M
於測試程式中操作git repository的helper
local GitRepo = {}
GitRepo.__index = GitRepo

function GitRepo.new(base)
  return setmetatable({base = base}, GitRepo)
end

function GitRepo:git_must_success(command)
  return self:command_must_success(vim.list_extend({'git'}, command))
end

function GitRepo:command_must_success(command)
  assert(self.base, self.base)
  local result = vim.system(command, {
    cwd = self.base,
    env = {
      GIT_CONFIG_GLOBAL = '/dev/null' --避免引入開發者本地git的global設定
    }
  }):wait()
  assert(
    result.code == 0,
    string.format(
      '%s> %s failed, code: %d, err: %s',
      self.base,
      table.concat(command, ' '),
      result.code,
      result.stderr
    )
  )
  return result
end

function GitRepo:head_sha()
  local result = self:git_must_success {'rev-parse', 'HEAD'}
  return vim.trim(result.stdout)
end
透過GitRepo於tempdir產生的暫存目錄建立git repository與commit
local tempdir = require('../tempdir')
tempdir.with(function (path)
  local repo = GitRepo.new(path)
  repo:git_must_success {'init'}
  repo:git_must_success {'config', 'user.email', '[email protected]'} -- 由於已經隔絕git讀取global設定,須設定假資料才能commit
  repo:git_must_success {'config', 'user.name', 'tester'}
  repo:command_must_success {'touch', 'file'} -- 新增假檔案
  repo:git_must_success {'add', 'file'} -- stage假檔案
  repo:git_must_success {'commit', '-m', 'first'} -- commit
end)
載入要測試的模組、註冊指令
git_helper模組會呼叫vim.api.nvim_create_user_command註冊ReferenceCommit指令
local git_helper = require('../../git_helper')
git_helper.init()
切換到git repository、建立空buffer並呼叫指令
local commit_sha = repo:head_sha(); -- 由git repository取得目前HEAD commit的sha
local sha_abbreviation = commit_sha:sub(0, 7) -- 只取前7碼,模擬使用者只輸入部份sha的情境
vim.api.nvim_command(string.format('cd %s', path)) -- path為tempdir提供的暫時目錄位置
vim.api.nvim_command('enew') -- 建立buffer
vim.api.nvim_command(string.format('ReferenceCommit %s', sha_abbreviation)) -- 呼叫指令,以sha前7碼作為指令的參數
比對buffer內容
由於測試程式於暫存目錄中的git repository建立的commit其commit message為:first
若目前HEAD的commit hash是0107b5452fb7c746d9fde786a3ce6b372215619c
我們期待指令於buffer內插入:0107b54 ("first")
local line = vim.trim(vim.api.nvim_get_current_line()) -- 抓取目前cursor所在位置整列內容
local expected = string.format('%s ("first")', sha_abbreviation)
assert(line == expected, string.format("%s != %s", expected, line)) -- 透過assert確認buffer的內容吻合我們期待的格式
And, that's it!